데이터 분석 및 ML/DL 프로젝트
이번 프로젝트는 3번째 프로젝트이다.
이전 여러번의 프로젝트를 했으나.. 여태 제대로 남긴적이 없어 이번에는 한번 제대로 해보려고 한다.
이번 프로젝트의 취지는 웹서비스를 주축으로, 데이터분석 및 머신러닝/딥러닝을 같이 곁들이는 것이다.
이번 주제는 UAM으로 정해봤다.
현재 서비스되고있지는 않지만 근래에 될 것 같기도하고, 드론을 타고다닌다는 발상이 참 멋지기도 하고 말이다.
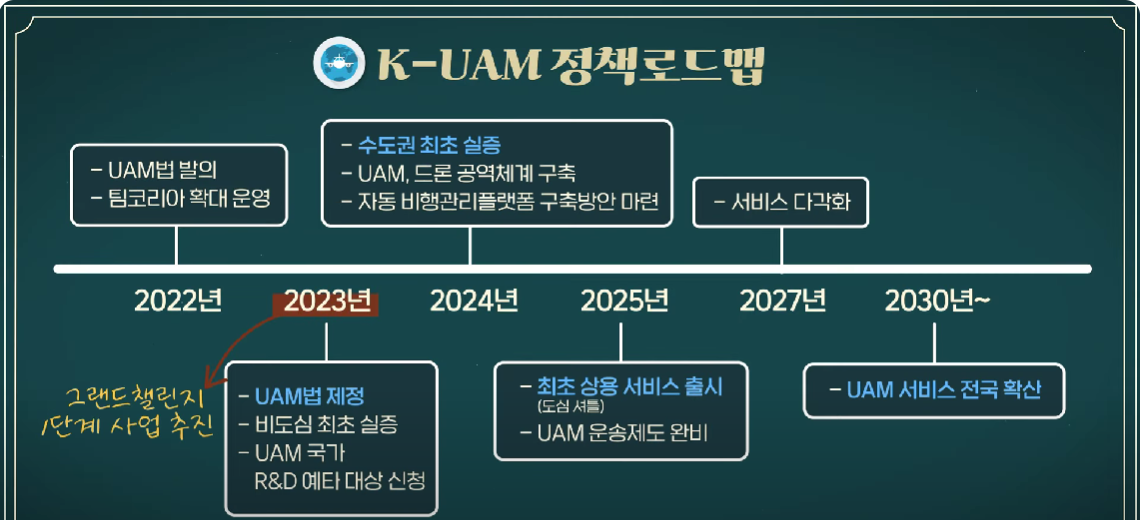
데이터분석은 아마도 UAM의 수요층 분석, 요금책정 등을 할 것 같고
오늘은 데이터 수집 및 UAM에서 사용될 기체에서 사고예방을 위한 객체인식 모델을 만들기위해 annotation 적용 작업을 해주려고한다.
AI-Hub
샘플 데이터 ? ※샘플데이터는 데이터의 이해를 돕기 위해 별도로 가공하여 제공하는 정보로써 원본 데이터와 차이가 있을 수 있으며, 데이터에 따라서 민감한 정보는 일부 마스킹(*) 처리가 되
www.aihub.or.kr
해당 링크에서 이미지 및 라벨링 이미지를 받아왔다. 여러 객체를 인식시킬 예정이기 때문.
해당 이미지는 json과 한쌍으로 매칭되어있고, 이를 받아와서 좌표값을 넣어주어 이미지에 덮어씌워주기로 했다.
img_path = "C:/Users/user/Downloads/bird_drone/bird/Training/train_bird_data/"
filenames = os.listdir(img_path)

json_path = "C:/Users/user/Downloads/bird_drone/bird/Training/label_train_bird_data/"
jsonnames = os.listdir(json_path)

len(filenames)

8842
os를 이용하여 폴더명을 받아 넣었다. 8842개임을 확인.
img =  img_path + filenames[0]
jsonname = json_path + jsonnames[0]

jsonname

C:/Users/user/Downloads/bird_drone/bird/Training/label_train_bird_data/IMG_0535468_bird(bird)_(4_1).json
경로까지 잘 적용된 모습이다.
sample1 = cv2.imread(img)
sample = cv2.cvtColor(sample1, cv2.COLOR_BGR2RGB)
cv2를 이용하여 이미지를 데이터화 시킨후, BGR2RGB를 통해 RGB로 변경해줬다.
with open(jsonname, 'r', encoding="utf-8") as f:
    data = json.load(f)

data

{'info': {'description': '객체 인식용 한국형 비전 데이터셋',
  'version': '1.0',
  'year': '2022',
  'main_category': 'bird'},
 'categories': [{'supercategory': 'animal', 'id': '15', 'name': 'bird'}],
 'images': [{'id': '0535468',
   'width': 1920,
   'height': 1080,
   'file_name': 'IMG_0535468_bird(bird).jpg'}],
 'annotations': [{'id': 856,
   'image_id': 535468,
   'category_id': 15,
   'iscrowd': 0,
   'bbox': [965.0, 359.0, 393.0, 335.0],
   'area': 131655.0},
  {'id': 857,
   'image_id': 535468,
   'category_id': 15,
   'iscrowd': 0,
   'bbox': [324.0, 423.0, 175.0, 342.0],
   'area': 59850.0}]}
내가 필요한것은 annotation의 bbox 임을 확인했고, 각각의 값은 x, y 좌표와 너비,높이 값임을 설명서를 통해 알아냈다.
bboxes = []
for i in data["annotations"]:
    bboxes.append(i["bbox"])

bboxes
[[965.0, 359.0, 393.0, 335.0], [324.0, 423.0, 175.0, 342.0]]
bboxes를 담은 뒤,
pt1 = (int(bboxes[0][0]), int(bboxes[0][1]))
pt2 = (int(bboxes[0][0]+int(bboxes[0][2])), int(bboxes[0][1])+int(bboxes[0][3]))
pt3 = (int(bboxes[1][0]), int(bboxes[1][1]))
pt4 = (int(bboxes[1][0]+int(bboxes[1][2])), int(bboxes[1][1])+int(bboxes[1][3]))
cv2.rectangle(sample, pt1, pt2, color=(255,0,255), thickness=2)
cv2.rectangle(sample, pt3, pt4, color=(255,0,0), thickness=2)
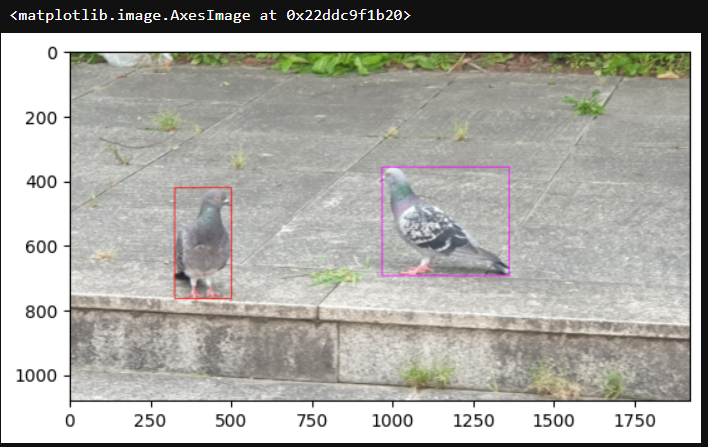
plt.imshow(sample)해당하는 x,y 좌표가 중앙값인지 시작값인지를 몰라 우선 시작값이라고 가정하고 진행했고, 다행스럽게 한번에 적용됐다.
음.. 이제 이걸 전체에 적용해야되는데...
img=[]
jsonname=[]
sample=[]
pre_img = ()
# for i in range(len(filenames)):
for i in range(10):
    img.append(img_path + filenames[i])
    jsonname.append(json_path + jsonnames[i])

    pre_img = cv2.imread(img[i])
    sample.append(cv2.cvtColor(pre_img, cv2.COLOR_BGR2RGB))

    with open(jsonname[i], 'r', encoding="utf-8") as f:
        data = json.load(f)

        bboxes = []
        # print(data)
        for j in data["annotations"]:
            bboxes.append(j["bbox"])
        # for j in data["annotations"]:
        # print(f"{bboxes}")
        # bboxes = data["annotations"]["bbox"]

            # pt1 = (int(bboxes[j][0]), int(bboxes[j][1]))
            # pt2 = (int(bboxes[j][0]+int(bboxes[j][2])), int(bboxes[j][1])+int(bboxes[j][3]))
            # cv2.rectangle(sample[i], pt1, pt2, color=(255,0,255), thickness=2)
        # print(bboxes)
    if len(bboxes) != 1 :
        for k in range(len(bboxes)) :
            pt1 = (int(bboxes[k][0]), int(bboxes[k][1]))
            pt2 = (int(bboxes[k][0]+int(bboxes[k][2])), int(bboxes[k][1])+int(bboxes[k][3]))
            cv2.rectangle(sample[i], pt1, pt2, color=(255,0,255), thickness=2)
    else :
        pt1 = (int(bboxes[0][0]), int(bboxes[0][1]))
        pt2 = (int(bboxes[0][0]+int(bboxes[0][2])), int(bboxes[0][1])+int(bboxes[0][3]))
        cv2.rectangle(sample[i], pt1, pt2, color=(255,0,255), thickness=2)

    plt.imshow(sample[i])
여기서 꽤 애를 먹었다.
우선 range가 너무커서 초반엔 실행조차 되지않아 10개로 제한을 두고 했었고,
이후에는 위에서 변수처럼 사용했던 것들을 모두 리스트화해서 append로 변경해주지 않아 꽤 list out of range로 꽤 오래 걸렸다.
또한 j로 놓은 annotation에서 bboxes를 초기화시키지 않아 라벨링이 제대로 적용되지않는 불상사가 발생하여 꽤 오래 고민했고....
객체의 개수에따라 차등하게 들어가야되는데, 해당 문제에서 꽤 오랜시간이 걸렸다.
결국 고생했지만... 성공한 모습.
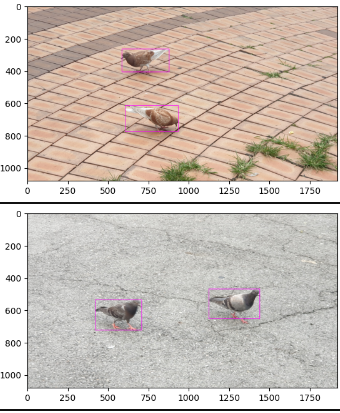
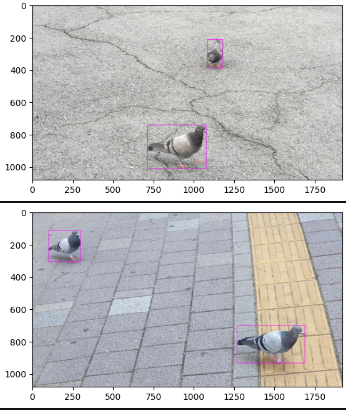
아무튼 그리하여 range를 len만큼 줬더니..... 펑(메모리 부족)
아.. 이거 1920x1080인데 resize를 해줘야하나...